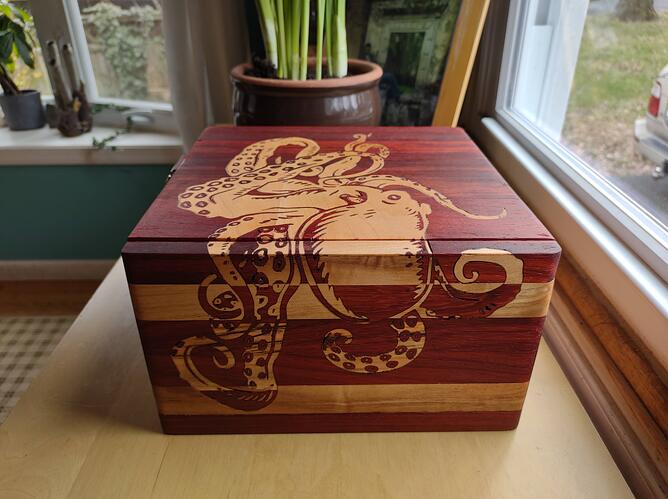
I made this as a holiday gift for the wife. The main dark wood is Padauk, the light wood is Maple. Don’t look too closely, there’s plenty of deviations from the plan to make it come together :). The box features hidden hinges, a combination lock and a tray that stores in the lid. The tray is made from Bird’s eye Maple and uses magnets to secure itself to the top of the open box to allow product assembly.
The overall design of the box was done in Fusion 360 and the v carve engraving for the inlay was done using F-Engrave.
The box surface was sanded down to 220 grit, cleaned up and then finished with boiled linseed oil. I’m still debating if I should have gone with a wax finish for a glossy look…
Beautiful work. Congratulations. Not having worked with Padauk before, what kinds of feed rates did you use?
Thank you, this was my first time working with Padauk as well. I would say I found it to be about as hard as hard Maple and so I used similar feeds and speeds. Although I will say that I bought these boards as dimensional lumber and my feeling is that the ones I got maybe had not dried out long enough and the wood seemed a bit gummy at times. But maybe that is just how Padauk is all the time and I just didn’t know it.
Looking through my notes, when clearing out the contour of the lid I used a 1 flute bit at 1000 mm/min, 12,000 rpm (my spindle’s max speed) and depth of cut was 1D, which in this case was 1/8". Then I did a finishing pass with a 3 flute 1/8" bit at 2,000 mm/min and 12,000 rpm and 2D depth of cut since it was removing only 0.5mm to get to size and finish.
The inlay is a different story, my experience with V-bits is that they have a much slower surface speed, maybe due to my setup. I used a 60 degree v-bit at 12,000 rpm, 300 mm/min and 4mm max depth of cut. I used these same numbers on Parota for inlay work as well. On the male side of the inlay, the Maple, I used the same numbers but required 2 passes since I made the max depth of cut 8mm to allow plenty of space to remove the backing.
Very nice work and a wonderful job on the inlay. Your wife should be proud.
Yes, she was very happy with it. I was very happy to have finished it on time  .
.
Great project 
Way to raise the bar!
Beautiful work. what software did you use to design/create the inlay
Thank you. The octopus was traced from a bitmap into Inkscape. From there I exported it as dxf so F-Engrave could read it.
This is awesome! I love how the inlay wraps around!
Thank you, yes I was hoping to make it look as if the octopus was crawling onto the box :).
Looks really cool! Ever tried Fusion for V-inlays?
I use Fusion for my hobby work quite extensively, but trying to get it to do an inlay became a trial of patience for me. If it is possible to do this clearly I failed at figuring it out and searching for help. I could get the female side to carve, no problem, but carving the inverse with the right clearance was not intuitive to me. F-engrave is purpose built and while it may not compute the most efficient cutting paths it certainly got the job done.
If you know of a good tutorial or instructions to follow to create an inlay with Fusion I would love to know about it  .
.
Very nice design and execution. You mentioned to not look too closely. You have absolutely nothing to apologize for. It’s a gorgeous keepsake.
I wrote a bit about it with example files on another forum.
I’ve done V- inlays with F-engrave, V-Carve, Easel Pro, Carbide Create, and Fusion… Mainly out of curiosity. I honestly think Easel is the simplest, but Fusion gives ultimate control. One of the cool things is that you don’t need to model anything. All the CAM can be done from your sketch. I also like it because of the toolpath control you don’t have to take an over-aggressive pass. It’s not perfect and takes some Fusion experience, but the results are great.
Let me know if you’re interested and I’ll PM you a link to my post.
Thanks @NeilFerreri1, yes I am interested  , please do share the link.
Thank you @PhilipErshler, you are very kind.
Wow! Amazing work. Brand new at this, got a machine for Christmas. How long does it take to make something like this? Carving time?
There’s a lot that goes into answering your question, tools available, depth of cut, type of bit, type of material, etc. Besides that there’s also the design. In this case the side and lid had to be carved separately which extends the time because there are tool changes involved and the stock has to be swapped.
If I was to interpret your question as the amount of time the machine was running to make the carvings and engravings then it took approximately 4-5 hours. The depth of cut was limited to half full depth so 2 passes were required. Also the high level of detail creates a lot of vertical motion since these inlays are made with a taper and not just a straight wall.
But the carving was the shortest part of the process, the planning and the assembly followed by the fixing and the finishing and the fixing again… That’s where I spent my late nights and weekends  .
.


