So, thinking more about your 4th Axis project @ErikJenkins, if you had clearance under the Y rails on both sides of the machine, and placed the chuck and tail in a channel that allowed you to put them outside or inside the workspace, you could effectively carve a 6 foot long walking stick by either flipping it half way thru, or moving the chuck outside the work area… Just sayin’
I could change the orientation from front to back and use a support at the back and I wouldn’t need any clearance under the rails 
Good point. My table is against a wall, so I tend to think in terms of unlimited X but Y is always hindered by the back wall…
Just using Y for A substitution and Grbl, I assume you’re happy enough w\ the results?
I finally ordered my linear rail Z today, and your 4th Axis is in my cart as well, but I’m thinking laser before rotary. 
I am happy with it, I’ll be happier with the new electronics so I can keep everything connected and not change settings back and forth 
I bet. I’m just weighing the options of dealing with GRBL and swapping Y, just so I can turn some walking sticks for the boy \ cub scouts as gifts, which might be a short-term “make 20 and done” versus changing out all the electronics…
Nice straight walking sticks would be fairly easy, with a good design and good stock.
Yeah, that’s what I’m thinking, even a 1.5" or 1.75" hardwood dowel rod would work, it wouldn’t need a ton of design work, just something scout related (wolves, bears, tigers, tents) and maybe their den \ pack number …
Sounds pretty nice.
I’ll post pics, probably 30 days out, just got that linear Z on order and I want to get that in first. The V wheels and eccentrics are frustrating me lately…
Thanks for doing the proof of concept 
SHHH! Dont give mother nature any wild ideas! She has had enough of her own lately.
@ErikJenkins that is stunning
Since it is not really possible to attach square stock to a 3 jaw chuck, I made a few faceplates to screw onto stock. I am testing it out in wood until I get one I like then I will cut it from aluminum.
It has 2 set screws…I haven’t taken it off yet to see what is in there…I’ll check it out later (it is hot in the shop  )…I have a few 4 jaw chucks, it would be nice if one fits.
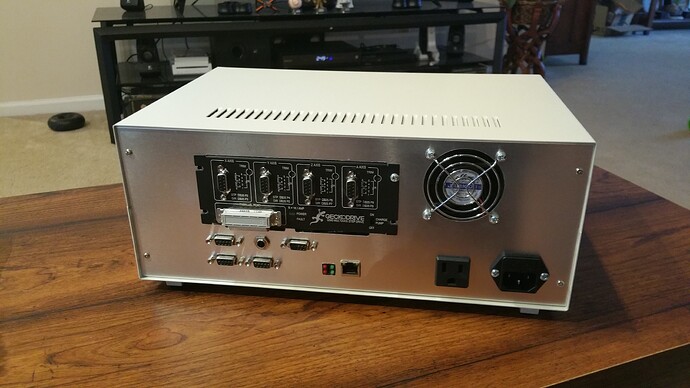
Where did you find that enclosure? Or did it come with your new controller?
What are all the extra connectors for?
I ordered it all assembled and ready to go by the folks at Camtronics,
The connectors are for:
5 motors (X, Y, Y, Z and A),
Probe connector using the same 1/4" headphone jack I’ve been using,
VFD/spindle connector for a future upgrade,
limit/homing switch connectors,
relayed outlet for the router,
another relayed controlled DB9 connector for something else.
All motors and limit/homing switches get DB9 connectors.
Ethernet port for connecting to the shop pc.


